I can never remember what all the SOPs do, so I’ve been meaning to make a cheat sheet for myself
There are ~95 SOPs here. Ctrl+F to search the post. Remember you can also bookmark this thread using the forum bookmark function.
Add
The Add SOP can both create new Points and Polygons on its own, or it can be used to add Points and Polygons to an existing input - Documentation

Alembic
The Alembic SOP loads and plays back Alembic file geometry sequences - Documentation
Align
The Align SOP aligns a group of primitives to each other or to an auxiliary input, by translating or rotating each primitive along any pivot point. - Documentation

Arm
The Arm SOP creates all the necessary geometry for an arm, and provides a smooth, untwisted skin that connects the arm to the body. It is controlled through inverse kinematics linked to a handprint. - Documentation

Attribute
The Attribute SOP allows you to manually rename and delete point, vertex, and primitive attributes. - Documentation
Attribute Create
The Attribute Create SOP allows you to add normals or tangents to geometry.
(needed when you use normal mapping; eg bump map) - Documentation

Basis
The Basis SOP provides a set of operations applicable to the parametric space of spline curves and surfaces. - Documentation

Blend
The Blend SOP provides 3D metamorphosis between shapes with the same topology. - Documentation

Bone Group
The Bone Group SOP groups primitives by common bones (shared bones). - Documentation
Boolean
The Boolean SOP lets you use one SOP to add to subtract from another. Both SOPs must be polygonal and must be closed, eg. no open tubes etc. - Documentation

Bridge
The Bridge SOP is useful for skinning trimmed surfaces, holes, creating highly controllable joins between arms and body, branches or tube intersections. The Bridge SOP is similar to the Skin SOP but with much greater control over the resulting surface. Given a set of profiles (i.e. curves on surface) and/or spatial faces, the Bridge SOP builds a NURBS skin with specified tangent and curvature characteristics. - Documentation
Cache
The Cache SOP collects its input geometry in a cache for faster random-access playback of multiple SOPs. It should be used when cook times for a chain of SOPs is long and a quicker playback is needed. - Documentation
Cap
The Cap SOP is used to close open areas with flat or rounded coverings. - Documentation

Capture Region
The Capture Region SOP defines capture region (cregion), which is a type of primitive which can be thought of as a modified tube primitive (a tube with half a sphere on either end). - Documentation

Capture
The Capture SOP is used to weight points in a geometry to capture regions. - Documentation
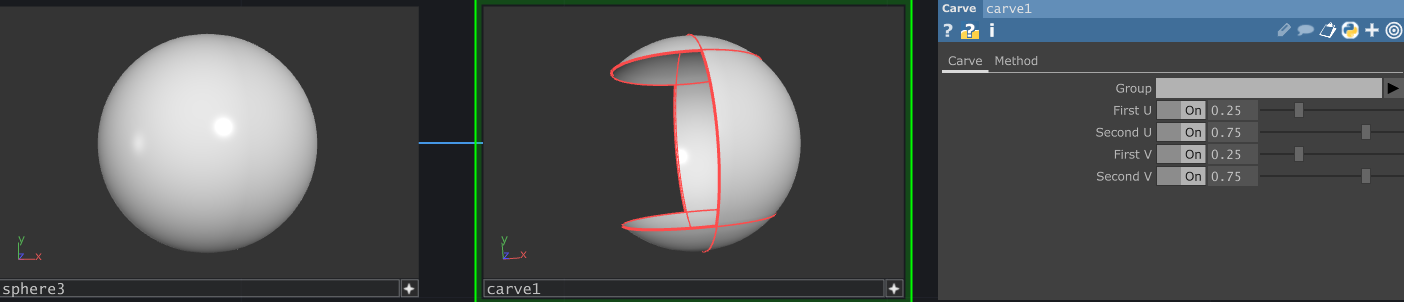
Carve
The Carve SOP works with any face or surface type, be that polygon, Bezier, or NURBS. It can be used to slice a primitive, cut it into multiple sections, or extract points or cross-sections from it. Like the Project SOP, it also creates profile curves, but they are extracted as iso-parametric (2D) profiles directly from a surface, whereas the Project SOP extracts a 3D curve projected onto a surface. - Documentation
CHOP to
The CHOP to SOP takes CHOP channels and generates 3D polygons in a SOP. - Documentation

Clay
The Clay SOP deforms faces and surfaces by pulling points that lie directly on them. As opposed to the Point SOP or other SOPs that manipulate control points (CVs), the Clay SOP operates on the primitive contours themselves, providing a direct, intuitive, and unconstrained way of reshaping geometry. - Documentation
Clip
The Clip SOP cuts and creases source geometry with a plane. - Documentation

Convert
The Convert SOP converts geometry from one geometry type to another type. Types include polygon, mesh, Bezier patch, particle and sphere primitive. - Documentation

Copy
The Copy SOP lets you make copies of the geometry of other SOPs and apply a transformation to each copy. - Documentation


CPlusPlus
The CPlusPlus SOP allows you to make custom SOP operators by writing your own plugin using C++. - Documentation
Creep
The Creep SOP lets you deform and animate Source Input (input0) geometry along the surface of the Path Input (input1) geometry. - Documentation

Cureveclay
The Curveclay SOP is similar to the Clay SOP in that you deform a spline surface not by modifying the CVs but by directly manipulating the surface. However, instead of using a point on the surface, you use one or more faces to deform that surface. - Documentation
Curvesect
The Curvesect SOP finds the intersections or the points of minimum distance between two or more faces (polygons, Beziers, and NURBS curves) or between faces and a polygonal or spline surface. - Documentation

DAT to
The DAT to SOP can be used to create geometry from DAT tables, or if a SOP input is specified, to modify attributes on existing geometry. - Documentation

Deform
The Deform SOP takes geometry along with point weights (assigned by the Capture SOP) and deforms geometry as Capture Regions are moved. This gives you the flexibility to procedurally modify geometry between the Capture and Deform SOPs. - Documentation
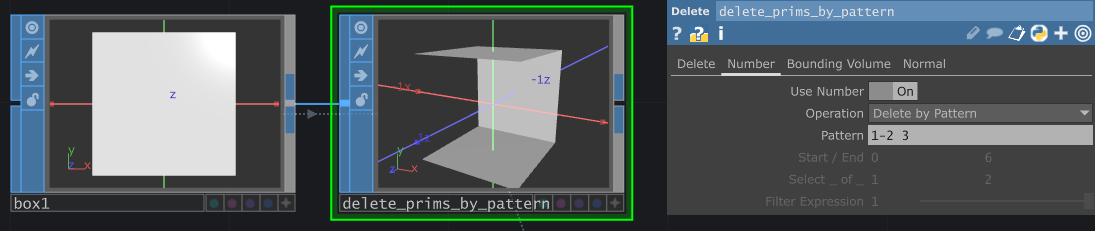
Delete
The Delete SOP deletes input geometry as selected by a group specification or a geometry selection by using either of the three selection options: by entity number, by a bounding volume, and by entity (primitive/point) normals. - Documentation

Divide
The Divide SOP divides incoming polygonal geometry. It will smooth input polygons, dividing polygons, as well as sub-divide input polygons using the Bricker option. - Documentation

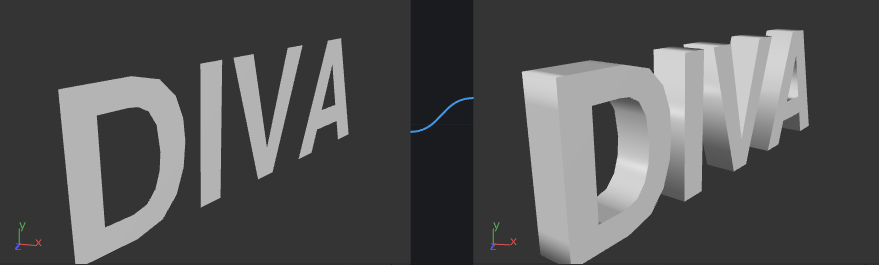
Extrude
The Extrude SOP can be used for:
- Extruding and beveling Text and other geometry
- Cusping the beveled edges to get sharp edges
- Making primitives thicker or thinner
Face Track
The Face Track SOP provides accesses to the fitted face mesh generated by the Face Track CHOP. - Documentation

Facet
The Facet SOP lets you control the smoothness of faceting of a given object. It also lets you consolidate points or surface normals. - Documentation


File In
The File In SOP allows you to read a geometry file that may have been previously created in the Model Editor, output geometry from a SOP, or generated from other software such as Houdini. The geometry file can be read in from disk or from the web. - Documentation
Fillet
The Fillet SOP is used to create smooth bridging geometry between two curves / polygons or two surfaces / meshes. Filleting creates a new primitive between each input pair and never affects the original shapes. This is in contrast to the Join and Stitch SOPs. The Join SOP converts and possibly changes the connected ends of primitives, and stitching changes the original shapes but does not change the number of resulting primitives. - Documentation

Fit
The Fit SOP fits a Spline curve to a sequence of points or a Spline surface to an m X n mesh of points. - Documentation

Force
The Force SOP adds force attributes to the input metaball field that is used by either Particle SOP or Spring SOP as attractor or repulsion force fields. In general, force values greater than 0 cause points to be attracted, less than 0 cause points to be repelled. - Documentation

Fractal
The Fractal SOP allows you created jagged mountain-like divisions of the input geometry. It will create random-looking deviations and sub-divisions along either a specified normal vector (the Direction xyz fields) or the vertex normals of the input geometry. - Documentation

Grid
The Grid SOP allows you to create grids and rectangles using polygons, a mesh, Bezier and NURBS surfaces, or multiple lines using open polygons. - Documentation

Group
The Group SOP generates groups of points or primitives according to various criteria and allows you to act upon these groups. Elements can occur in more than one group. Groups are used in many parts of the SOP Editor to specify which portion(s) of input geometry you wish a SOP to act upon. - Documentation

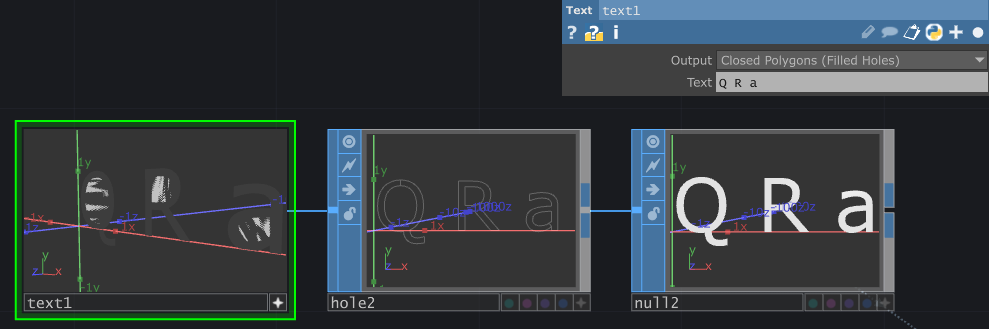
Hole
The Hole SOP is for making holes where faces are enclosed, even if they are not in the same plane. It can also remove existing holes from the input geometry. - Documentation
Import Select
The Import Select SOP is used to import and load the geometry types primitives defined in USD COMP and FBX COMP. - Documentation
Inverse Curve
The Inverse Curve SOP takes data from an Inverse Curve CHOP and builds a curve from it. - Documentation
Iso Surface
The Iso Surface SOP uses implicit functions to create 3D visualizations of isometric surfaces found in Grade 12 Functions and Relations textbooks. - Documentation

Join
The Join SOP connects a sequence of faces or surfaces into a single primitive that inherits their attributes. Faces of different types can be joined together, and so can surfaces. Mixed face-surface types are not allowed. - Documentation

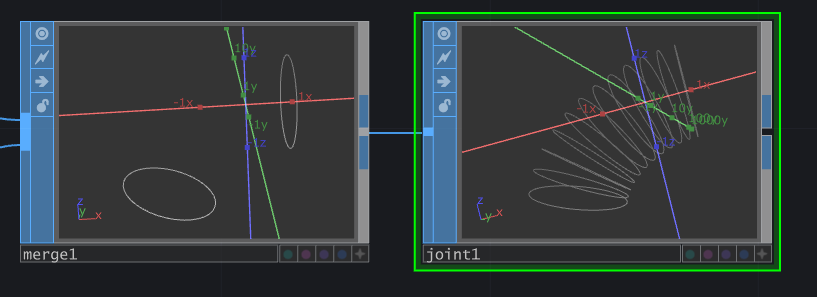
Joint
The Joint SOP will aid in the creation of circle-based skeletons by creating a series of circles between each pair of input circles. - Documentation
Lattice
The Lattice SOP allows you to create animated deformations of its input geometry by manipulating grids or a subdivided box that encloses the input source’s geometry. It is much easier to deform an object by moving a few grids than trying to animate every single point of an object. - Documentation

Limit
The Limit SOP creates geometry from samples fed to it by CHOPs. It creates geometry at every point in the sample. - Documentation

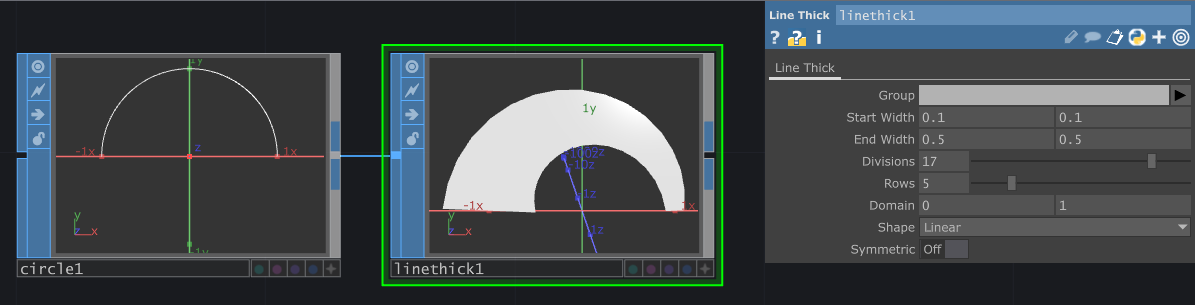
Line Thick
The Line Thick SOP extrudes a surface from a curved line. The line can be of polygon, NURBS, or Bezier geometry type. - Documentation
LOD
The LOD SOP is unusual in so far as it does not actually alter any geometry. Instead it builds a level of detail cache for the input object. The cache to be drawn is based upon the distance to the camera. Thus, a complicated object will be drawn with a lower level of detail when it is farther away. - Documentation
LSystem
L-systems allow definition of complex shapes through the use of iteration. They use a mathematical language in which an initial string of characters is evaluated repeatedly, and the results are used to generate geometry. The result of each evaluation becomes the basis for the next iteration of geometry, giving the illusion of growth. You begin building an L-system by defining a sequence of rules which are evaluated to produce a new string of characters. - Documentation

Magnet
The Magnet SOP allows you to affect deformations of the input geometry with another object using a “magnetic field” of influence, defined by a metaball field. It allows the creation of animated bumps and dents within objects, and other special effects. - Documentation

Material
The Material SOP allows you to assign textures to geometry at the SOP level. This is useful if you need to texture a specific part of a more complex piece of geometry, as it takes precedence over the Material specified in the Geometry component parameter. - Documentation

Merge
The Merge SOP merges geometry from multiple SOPs. - Documentation

Metaball
The Metaball SOP creates metaballs and meta-superquadric surfaces. Metaballs can be thought of as spherical force fields whose surface is an implicit function defined at any point where the density of the force field equals a certain threshold. - Documentation

Model
The Model SOP holds the surface modeler in TouchDesigner. It is designed to hold raw model geometry constructed using the SOP Editor (aka Modeler). It holds modeled data and cannot be unlocked - protecting you from losing your model data.
Noise
The Noise SOP displaces geometry points using noise patterns. It uses the same math as the Noise CHOP. - Documentation

Object Merge
The Object Merge SOP allows you to merge the geometry of several SOPs spanning different components. The SOP data will be baked so that all merged SOPs are relative to each other as if they were located using the transforms of the COMPs they originally came from. - Documentation

Particle
The Particle SOP is used for creating and controlling motion of “particles” for particle systems simulations. - Documentation

Point
The Point SOP allows you to get right into the geometry and manipulate the position, color, texture coordinates, and normals of the points in the Source, and other attributes. The Point SOP also lets you create custom point attributes. It is the complement to the Primitive SOP. - Documentation

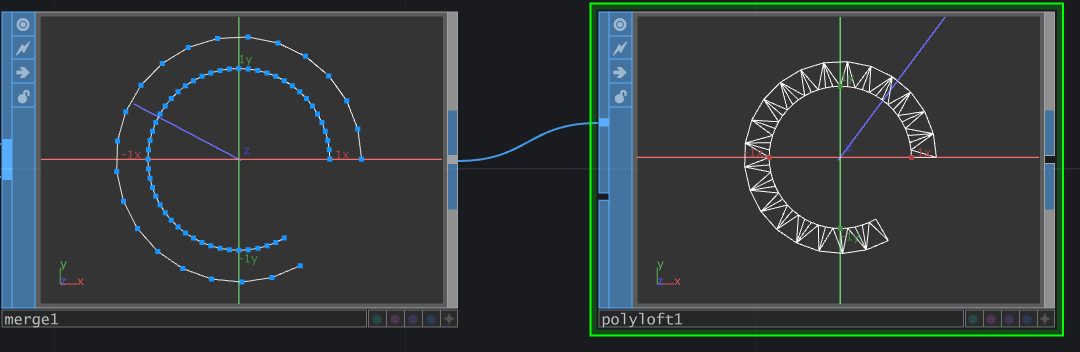
Polyloft
The Polyloft SOP generates meshes of triangles by connecting (i.e. lofting/stitching) the points of open or closed faces without adding any new points. - Documentation
Polypatch
The Polypatch SOP creates a smooth polygonal patch from a mesh primitive or a set of faces (polygons, NURBS or Bezier curves). - Documentation
Polyreduce
The Polyreduce SOP reduces a high detail polygonal model into one consisting of fewer polygons. The second input’s polygons represent feature edges. - Documentation

Polyspline
The Polyspline SOP fits a spline curve to a polygon or hull and outputs a polygonal approximation of that spline. - Documentation
Polystitch
The Polystitch SOP attempts to stitch polygonal surfaces together, thereby eliminating cracks that result from evaluating the surfaces at differing levels of detail. - Documentation
Primitive
The Primitive SOP is like the Point SOP but manipulates a primitive’s position, size, orientation, color, alpha, in addition to primitive-specific attributes, such as reversing primitive normals. - Documentation

Profile
The Profile SOP enables the extraction and manipulation of profiles. You will usually need a Trim SOP, Bridge SOP, or Profile SOP after a Project SOP. - Documentation
Project
The Project SOP creates curves on surface (also known as trim or profile curves) by projecting a 3D face onto a spline surface, much like a light casts a 2D shadow onto a 3D surface. - Documentation

Rails
The Rails SOP generates surfaces by stretching cross-sections between two rails. This is similar to the Sweep SOP, but it gives more control over the orientation and scaling of the cross-sections. - Documentation

Raster
The Raster SOP converts TOP image data to geometry by scanning left to right, top to bottom, outputting a geometry point at each pixel. This output can be used to display image data on laser devices, oscilloscopes or similar devices using the Laser CHOP. - Documentation
Ray
The Ray SOP is used to project one surface onto another. Rays are projected from each point of the input geometry in the direction of its normal. This can be used to drape clothes over surfaces, shrink-wrap one object with another, and other similar effects. - Documentation

Refine
The Refine SOP allows you to increase the number of CVs in any NURBS, Bzier, or polygonal surface or face without changing its shape. It is also used to decrease the number of CVs within a given tolerance (i.e. a simple but fast method of data reduction). - Documentation

Resample
The Resample SOP will resample one or more primitives into even length segments. It only applies to polygons so when presented with a NURBS or Bezier curve input, it first converts it to polygons using the Level of Detail parameter. - Documentation

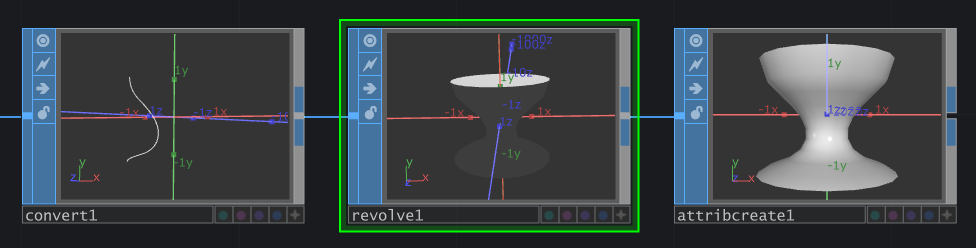
Revolve
The Revolve SOP revolves faces to create a surface of revolution. The revolution’s direction and origin are represented by guide geometry that resembles a thick line with a cross hair at the centre. The cross hair represents the origin of the revolve as entered in the dialog and the stick represents the direction. - Documentation
Script
The Script SOP runs a python script each time the Script SOP cooks. - Documentation
Sequence Blend
The Sequence Blend SOP allows you do 3D Metamorphosis between shapes and Interpolate point position, colors, point normals, and texture coordinates between shapes. - Documentation

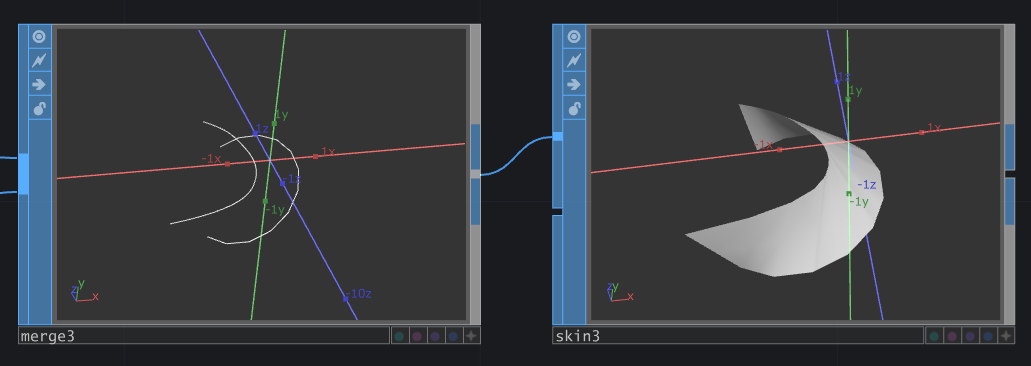
Skin
The Skin SOP takes any number of faces and builds a skin surface over them. - Documentation
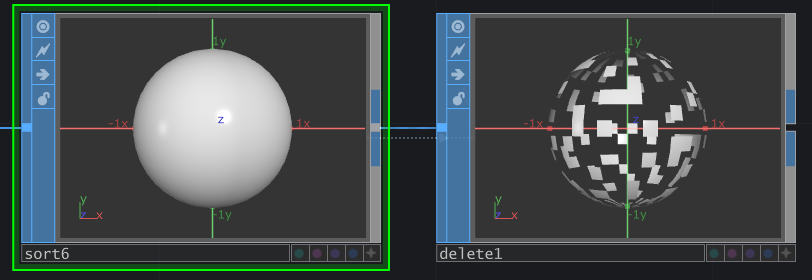
Sort
The Sort SOP allows you to sort points and primitives in different ways. Sometimes the primitives are arranged in the desired order, but the point order is not. There are many possible combinations. To sort vertices, use the Primitive SOP. - Documentation
Spring
The Spring SOP deforms and moves the input geometry using spring “forces” on the edges of polygons and on masses attached to each point. - Documentation

Sprinkle
The Sprinkle SOP is used to add points to either the surface or the volume of a SOP. - Documentation

Sprite
The Sprite SOP creates geometry (quad sprites) at point positions defined by the CHOP referenced in the XYZ CHOP parameter. - Documentation
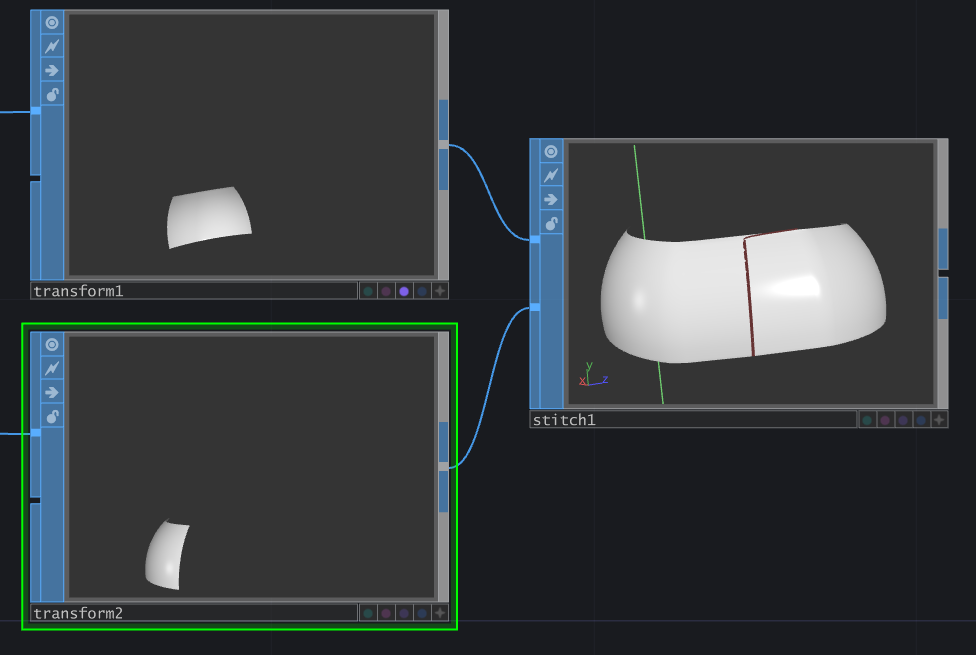
Stitch
The Stitch SOP is used to stretch two curves or surfaces to cover a smooth area. - Documentation
Subdivide
The Subdivide SOP takes an input polygon surface (which can be piped into one or both inputs), and divides each face to create a smoothed polygon surface using a Catmull-Clark subdivision algorithm. - Documentation

Superquad
The Superquad SOP generates an isoquadric surface. This produces a spherical shape that is similar to a metaball, with the difference that it doesn’t change it’s shape in response to what surrounds it. - Documentation

Surfsect
The Surfsect SOP performs boolean operations with NURBS and Bezier surfaces, or only generates profiles where the surfaces intersect. - Documentation

Sweep
The Sweep SOP sweeps primitives in the Cross-section input along Backbone Source primitive(s), creating ribbon and tube-like shapes. The cross-section primitives are placed at each point of the backbone perpendicular to it. - Documentation

Texture
The Texture SOP assigns texture UV and W coordinates to the Source geometry for use in texture and bump mapping. - Documentation

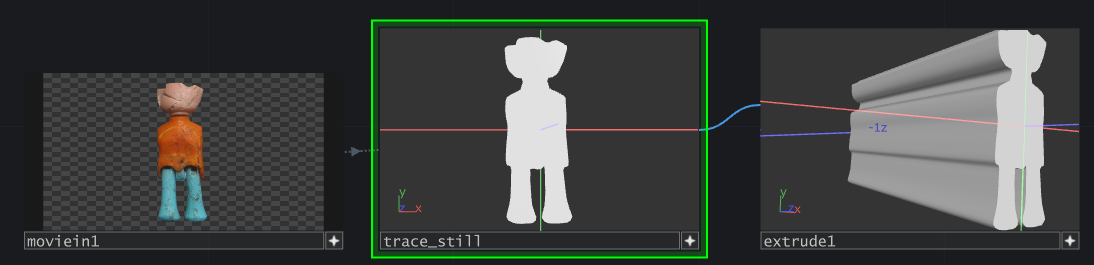
Trace
The Trace SOP reads an image file and automatically traces it, generating a set of faces around areas exceeding a certain brightness threshold. - Documentation
Trail
The Trail SOP takes an input SOP and makes a trail of each point of the input SOP over the past several frames, and connects the trails in different ways. - Documentation

Transform
The Transform SOP translates, rotates and scales the input geometry in “object space” or local to the SOP. The Model Editor and the Transform SOP both work in “object space”, and change the X Y Z positions of the points. In contrast, animating the transformation channels of an object in the Geometry Viewer Pane moves/scales the entire object in “world space” and does not affect the XYZ point positions of the geometry. - Documentation
Trim
The Trim SOP cuts out parts of a spline surface, or un-cuts previously cut pieces. When a portion of the surface is trimmed, it is not actually removed from the surface; instead, that part is made invisible. - Documentation

Tristrip
The Tristrip SOP convert geometry into triangle strips. Triangle strips are faster to render than regular triangles or quads. - Documentation
Tube
The Tube SOP generates open or closed tubes, cones, or pyramids along the X, Y or Z axes. - Documentation

Twist
The Twist SOP performs non-linear deformations such as bend, linear taper, shear, squash and stretch, taper and twist. Each deformation will distort the object in one or more axes. - Documentation

Vertex
The Vertex SOP allows you to edit/create attributes on a per-vertex (rather than per-point) basis. It is similar to the Point SOP in this respect. - Documentation
Wireframe
The Wireframe SOP converts edges to tubes and points to spheres, creating the look of a wire frame structure in renderings. - Documentation

history:
220728 made the post into a wiki; increased image scaling
220719 formatting and typos; added images for Add, Grid
220718 initial post